Tie-Dye, Reverse-Dye, Oh My!
STEM ActivitiesDate May 1, 2026
Est. Reading Time 4 mins
Give new life to an old T-shirt when you add – or remove – color, produce striking patterns and show off your one-of-a-kind style! How can you do this? With a tie-dye or reverse tie-dye kit, some common household products and your own limitless creativity. Keep reading to uncover general instructions and the lessons you’ll pick up along the way.
Typical Tie-Dye
Do you have a white cotton or linen shirt hidden in the back of your closet that you haven’t touched this season? Maybe it has a small stain from a berry breakfast, or you just prefer the vibrant hues of a summer wardrobe. With parent permission, this forgotten shirt is the perfect canvas for your next masterpiece!
Using a tie-dye kit (we recommend this one), select your favorite colors and pattern. Make sure you’re in an area that can get messy, or put down a wire rack over a plastic tablecloth to keep your space safe. We also recommend wearing gloves and having a large sealable plastic bag nearby for when you’re ready to transport your shirt. Now is the fun part – follow the instructions on your kit as you get your shirt damp, mix up your dyes, and start folding, twisting and pinching your shirt to create your desired pattern. Secure in place with rubber bands and you’re ready to go! Will you try a spiral, freeform, a heart or another pattern that’s all your own? We can’t wait to see how your design comes to life!
Vary your colors in each section of your secured shirt but remember color theory – as they bleed together, colors will mix. Then, flip and repeat. Carefully move your canvas into a plastic bag and seal to let the colors set overnight. The next day, you will want to remove the rubber bands, rinse out excess dye and wash the shirt on its own to reveal your final work of art!
Reverse Tie-Dye
Maybe the shirt you want to work with is darker in color. May we suggest your dark purple Camp Invention® T-shirt? Try a reverse tie-dye technique! It will require an extra step of removing color from the shirt, but the results are just as cool. To avoid making your own bleach solution, we encourage using a kit.
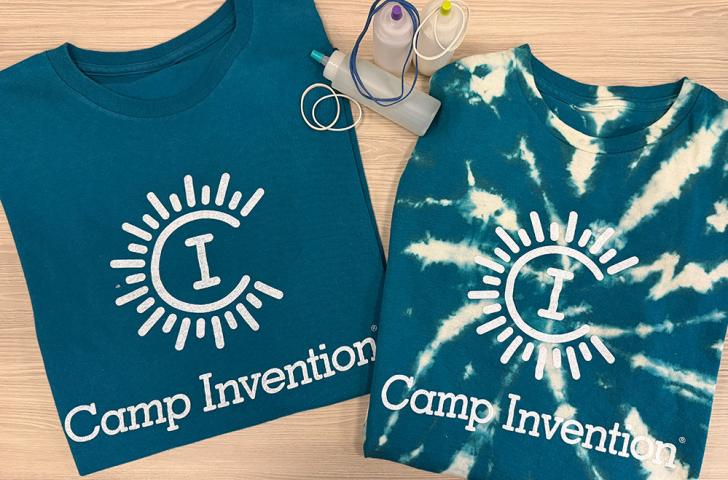
Follow all the same precautions as you would with a traditional tie-dye setup to avoid mess, while also being certain you are in a well-ventilated area. Safety is essential, so we recommend having an adult with gloves, a face mask and safety glasses take the lead in the bleaching process. Select your pattern and carefully follow the instructions on your kit. You want to first use the bleach mix to lighten the shirt, then you can decide if you like the pattern as is or if you want to add some fun colors to your final design!
The STEAM Behind it All
While you stretch your creativity and practice personalization, you’re also putting STEAM learning into action. You’re designing your own pattern and using tools to bring art to life. You’re learning color theory by observing how the dye colors mix to form new hues. You’re also being introduced to chemistry, observing how bleach changes the chemical structure of your shirt’s color.
Bleach is an oxidizing agent that decolorizes fabrics. It changes dyed clothing by removing electrons from dye molecules and breaking the chemical bonds that make up chromophores — the parts of molecules responsible for absorbing visible light and creating color. When these bonds are broken, the dye molecules can no longer absorb light, causing the fabric to appear lighter or closer to its original fiber color. Be careful — the bleach doesn’t just break down color but also can weaken the clothing fibers if used too heavily!
Learn More
To uncover new ways to explore STEAM in the world around you, continue to browse our blog!